QUICK & EASY SHORTS TUTORIAL - SEWING

Have you ever wanted to make your kids clothes instead of buying them? It can be daunting to delve into the realm of the seamtress if you are new to sewing. But don't let that put you off. Simple skirts (which I'll post another day) & shorts are an easy garment to start with, though, sometimes all you need is a few little tricks of the trade and you will be sewing with a new enthusiasm.
So first of all you will need to gather your supplies -
~ Any basic sewing machine will do the job, if you have an overlocker/serger then use it for finishing but it's not necessary.
~ A basic shorts pattern, no pockets, elastic waistband. You can pickup sewing patterns at your local fabric store. *In the middle of the pattern book you will find a section for simple/easy to sew patterns. Pick one of these, they are cheap too!
~ Pins, Tailors Chalk, 3/4" - 1" wide elastic (I used the non-roll but whatever you have is fine for your first go)
~ Scissors, Iron for pressing & some awesome fabric (you can save the good stuff till you are more confident if you like) I use quilting weight cotton, because it wears and washes really well, sews nicely and the iron loves it!
 Step 1. Trace your shorts pattern pieces off your original pattern - that way you will get the size you need, but not waste you paper pattern by cutting through all the other sizes.
Once you have your pattern traced, (I use cheap greaseproof paper for tracing) label your pieces, so you will have one piece for the front & one for the back. Cut out your traced pieces and pin them to your fabric, making sure that you have right sides together and if your fabric print goes in one direction (directional), make sure your pieces are the right way up. Cut out your fabric and clearly mark them either the front or back with tailors chalk on the wrong side.
Step 2. Take one front and one back piece and lay them right sides together, matching the inner leg seam - thats the small one :-)

Step 3. Sew your inner leg seam at stated seam allowance in the pattern. Repeat with the other front
& back. Finish your seams with your overlocker/serger or you can simply zigzag close to the edge to stop your fabric from fraying. Press your seams toward the back piece.

Step 4. Lay flat your now joined front and back piece wrong side up and press up first 1cm hem, then
fold that over another 1cm to give you a narrow hem. (Hems are subjective, you really can make them whatever size you want). Only press for now, repeat with the other front & back piece. DO NOT SEW YET - YOU'LL THANK ME LATER!
Step 5. Unfold your hems, pressing them flat with your fingers. Lay your pieces right sides
together, matching your crotch seam. Pin, making sure to line up your inner leg seams perfectly. It helps if you start pinning here and work your way upwards on both sides. Sew your seam & finish with overlock or zigzag. Press you seam to towards the back.

 Step 7. You will now see your crotch seam (the long one you've just sewn) is centered at the top and bottom of your piece. You now bring those seams together, matching your side seams. Hold you shorts up and give them a little shake out - this will help them sit correctly for you to pin. Your shorts should now look like this. You will notice that your front pieces are narrower then your backs, thats how they should be to accomodate the seat (room for your bottom is the less technical term :-) )
Step 8. Time to sew up your side seams. Pin your side seams one at a time, lining up the top & bottom edges - make sure to unfold your pressed up hem, you don't want to sew it up yet! Sew your seams and finish your edges in your preferred way.
Step 9. Now for the waistband! The first thing to do is to finish your raw edge of your
waistband. Use your overlocker/serger or zizgzag here. Be careful not to catch in your shorts as you finish the edge. Now press down a 1" waistband all around the top edge, wrong side facing you. Stitch this seam making sure to leave a gap for adding in your elastic! *This is a good time to add in your product & size labels if you are selling your shorts.
Step 10. Time for your elastic! Cut your elastic according to your pattern specifications (I'm
 making a size 2 here so I have 47cm of non-roll elastic) Use a bodkin or a really large safety pin to thread the elastic through your waistband, be very careful not to twist it! * I always look at which way my seams are pressed and follow their direction when threading elastic, that way the elastic doesn't get caught up on your seams - this is the reason for finishing and pressing your seams. Even if you aren't making to sell, you will have less trouble with the elastic.
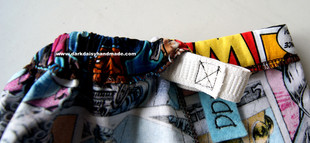
Step 11. Making sure your elastic isn't twisted, overlap the ends about 1.5cm and stitch securely. *I have learnt over the years that sewing a square and then diagonaly through it, is the most secure and comfortable way to sew your elactic.

your happy with how its sitting, close the gap in your waistband carefully - DO NOT SEW THROUGH YOUR ELASTIC!


Step 14. Turn your shorts inside out so you wrong sides are facing you. Refold & press up your hems - you can thank me now! how easy was that! It's way better then trying to wrangle the iron & get a neat hem at the same time. Stitch your hems and.....
YOU'RE ALL DONE!!!

Time to give yourself a big high five, chase the little monster around the house until you can wrangle them on and watch as your little one thinks you are to coolest mum ever! I mean seriously, what more praise could you possibly ask for? Kids are unbiased and can't fake loving something. So revel in your new-found awesomeness and go sew a gazillion more!
I hope this has helps you create a more sustainable life for your family, these shorts will last your kid, someone's else kid, and probably someone else's kid - Handmade is like that!
If you found this tutorial helpful of have any suggestions please leave me comment.
Don't forget to get Social!
Join our facebook group All Things Dark Daisy and post your pics of your completed shorts!
No comments:
Post a Comment